Sunday 29 June 2014

Spicy Chicken Cesar Salad

Spicy Chicken Cesar Salad-Lynn's Recipe

4 Chicken Breast
1 Medium to Large Head of Romaine Lettuce (2 small)
4 Slices of Garlic Bread
1/2 cup to 1 cup of Cesar Salad Dressing
1/4 cup to 1/2 cup of Hot Sauce
1/2 cup Bacon Bits
1/2 cup Grated Parmesan Cheese
1-2 Tbsp Club House: la Grille: Chipotle Mango Seasoning (or your favorite spicy seasoning mix)

This was a prompt to recipe one day when it was really hot here in the Okanagan.  I wanted something simple and taste to feed my family.  Sometimes when it's really hot, no one is too hungry, but this hit the spot.
My entire family liked it!


Preheat and clean BBQ grill.  
Place chicken on the grill and sprinkle with chipotle mango seasoning.
Grill between 5-8 minutes per side.

While the chicken in grilling, wash, dry and chop the lettuce into bite size pieces.
Place it in a bowl and set aside.

Flip chicken and sprinkle with chipotle mango seasoning on grilled side.

Sprinkle hot sauce on each piece of chicken.

Now add your garlic bread to the grill.  It's fine if you accidentally burn a bit of the 
edges of the bread like I did, you turn them into nice croutons later.

Flip the chicken breast one more time and add more hot sauce to the other side.
Grill for 2 minutes and remove chicken from grill.

Pour and mix cesar salad dressing in bowl.  You can use as much dressing as your like.  
I prefer not too much dressing, while others like a lot of dressing.

Place lettuce on a plate.
  
Chop up garlic bread into crouton size pieces.  
The nice thing about making croutons like this, is that they aren't too hard and have lots of garlic flavor.

Slice chicken breast horizontally.

Add croutons and parmesan cheese to your lettuce.

Place sliced chicken on top and enjoy!

This is a great way to enjoy a healthy dinner or lunch with a friend.
This is easy and quick to make, perfect for a hot summer day.

Tuesday 24 June 2014

Cinnamon Buns with Cream Cheese Icing

Cinnamon Buns-Lynn's Recipe

Buns:
1/4 cup Warm Water
3/4 cup Warm Milk
2 1/2 tsp Fast Rising Yeast
1/4 cup White Sugar
1/2 tsp Salt
2/3 cup Softened Margarine
3 cups All Purpose Flour

Filling:
1 1/4 cup Brown Sugar
1 1/2 Tbsp Cinnamon
1/2 cup Softened Margarine

Cream Cheese Icing:
1/2 cup Softened Butter(Has to be butter for flavor)
1 cup Cream Cheese
3 cups Sifted Icing Sugar

My family loves these,especially fresh out of the oven.  I always double the recipe so I can freeze one batch for when we have company or just as a special treat in my teenagers lunches.  If you freeze them or want them warm, just popping them into the microwave for 30-45 seconds, and they melt in your mouth.  

Before you start, turn the light on in your oven, I explain why later.
Your milk and water need to be luke warm, not too hot and not too cold, so the yeast can become active.
Mix the warm milk, warm water, sugar, and salt.  
Sprinkle the yeast on top of the warm mixture and set aside for 5-10 minutes.
The yeast will start to grow and then you know you have the right temperature for your buns.

Once the yeast is active, add the margarine and flour and mix until blended.


Now you can knead the dough with your hands, adding a bit of flour as your dough needs it (if it starts to stick your hands or dough hook), or you can knead it for 5 minutes in a Kitchen Aide with a dough hook.

While the dough is kneading, grease a large bowl that you will transfer the dough to so it can rise.
I like to use the wrapper from the margarine squares, that way nothing goes to waste.

Place dough into greased bowl and place it into a warm place to rise for 1 hour.
I put the light on in my oven, and this will create a great place to let your dough rise. 

While the dough is rising, you can prepare the filling the cinnamon buns with.
Add the brown sugar and cinnamon to a bowl.

Mix the mixture until well blended.  
I use my hands to do this because you can feel if there are any lumps in your brown sugar 
and allows you to break them down quickly and easily.
This will give you a nice texture to sprinkle on later.
Grease the dish you will be baking with.  I use a lasagna dish and small casserole dish.

 After one hour of rising, take your dough out of the oven, place it on a well floured surface, 
and roll it out in a rectangular shape.  Here I like to use my dining table.

Take your 1/2 cup of margarine and spread it evenly over the entire dough.

Sprinkle the brown sugar and cinnamon mixture evenly over the dough and margarine.
I like to pat it down into the butter a bit to help it stick better to the dough.

Start rolling it from the side closest to you working away from you.

Slice the tube of dough about an inch in length, trying to keep them even in size.

Place them in your greased dish with some space to rise one more time.

Place them in the warm oven again to rise for 30 minutes.
Pull them out of the oven and let them rise for another 15 minutes while your oven warms up.  
Preheat oven to 350'F.

Place them in the oven and bake for 15-20 minutes. 
When they start to turn brown on the edges, they are done.

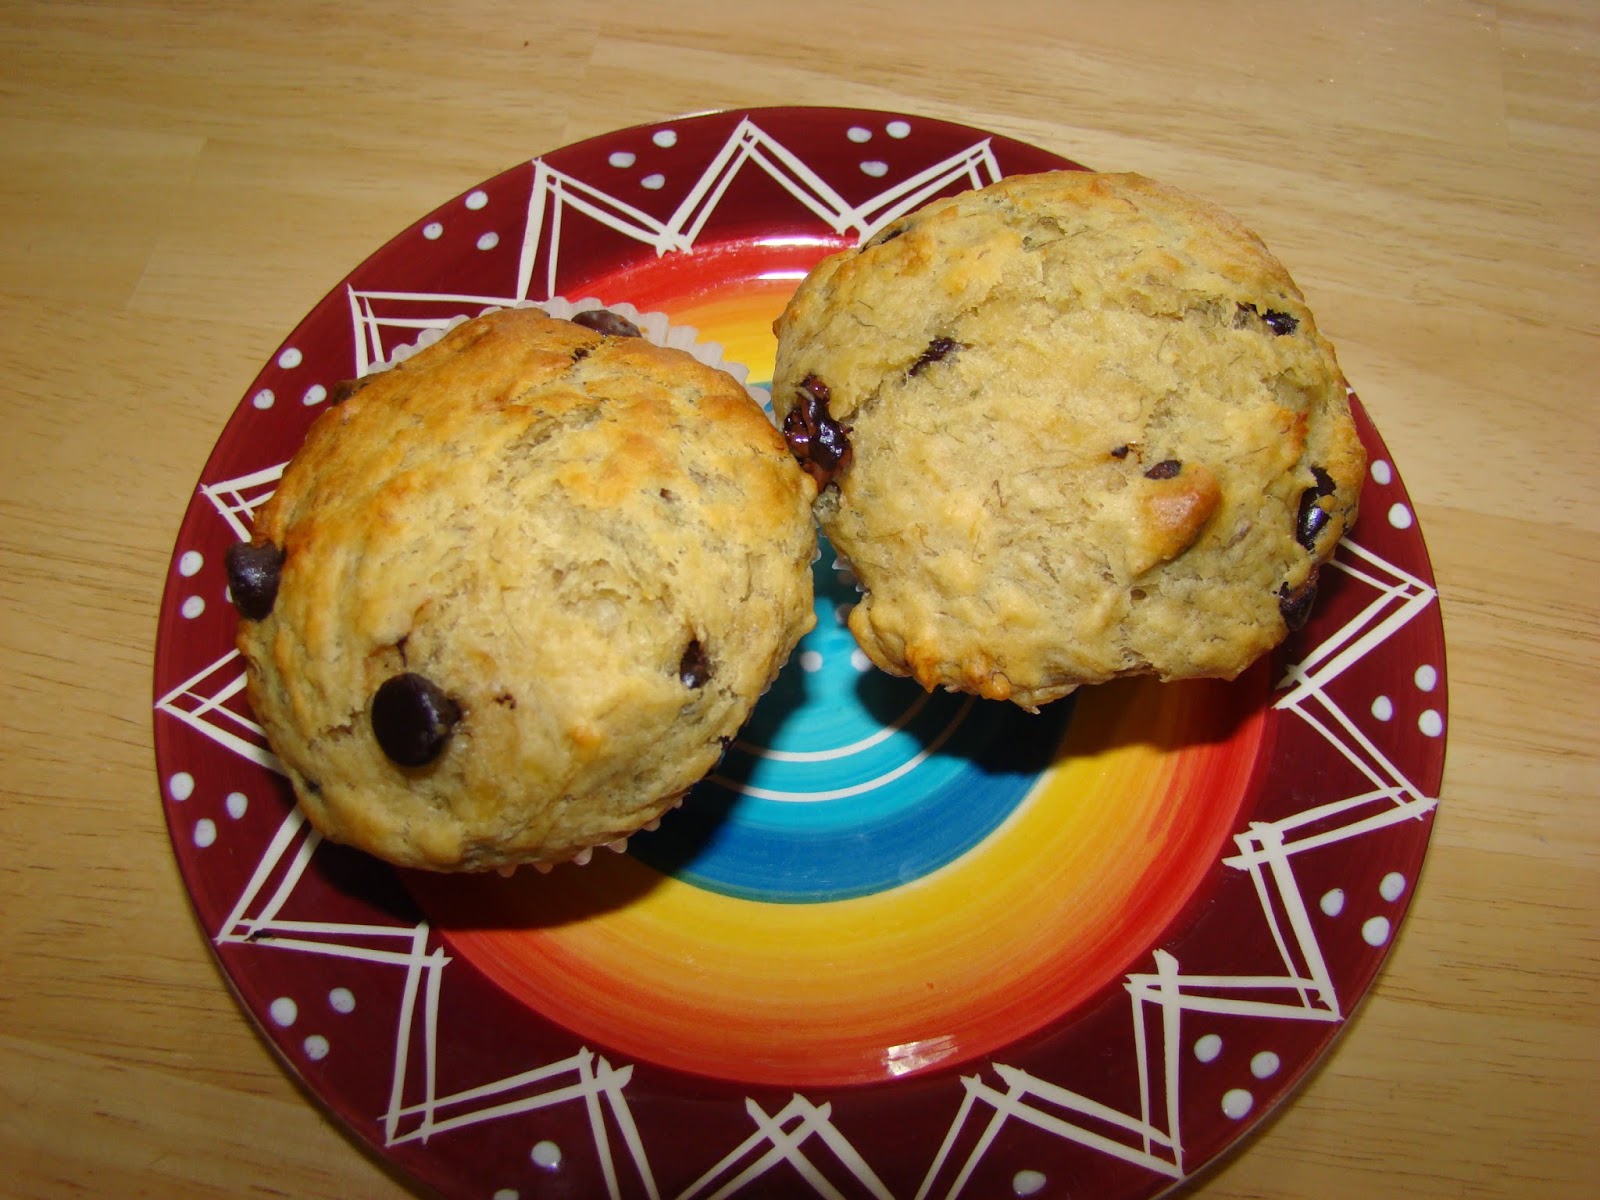
Don't these look amazing.  I am trying to keep the family at bay until the cream cheese icing is done.  
It's painful to have to take pictures during the process as it takes longer to bake and cook.

Here are the thigns you will need for the cream cheese icing.

Whip together the softened butter and cream cheese.

Add icing sugar, one cup at a time and mix in between each cup you add.  
This will help it not be clumpy and give it an nice creamy mixture.

It was all worth the wait!  I hope your family enjoys this yummy treat as much as mine does.
You can freeze these in a container for up to a month.
They taste best warm, so warm them up in the microwave before eating them.  
This makes them moist and gives them a fresh taste, even 3 days later.

Now if you want to enjoy these for breakfast first thing in the morning, you can leave them covered in your oven over night.  They will rise nicely and slowly remove them in the morning to preheat the oven.  I usually go into the shower at this point.  Then when the oven is warm and serve fresh for breakfast.


Sunday 22 June 2014

Reebee App

Hello everyone!


I am excited to share a great app that can help you save money.  This app is customized to where you live and will upload all the flyers in your area.  I use this app regularly to help save money and to help me figure out where I can shop to get the best deals in my area.  If you don't have time to go shopping all over town, you can use this app to price match at Wal-Mart.  I have made my shopping list most weeks from the flyers on this app.  You click on the flyer you want to look at and it's all there at your finger tips.  It's easiest to see from your iPad but can be used from your iPhone easily too.  Hope you enjoy this app as much as my sister-in-law and I do!


Setting up Categories on your Blogspot Blog

Here is a wonderful video off of YouTube.  It showed me how to add categories to my blog to help keep it organized and easier for others to follow.  It will help me keep my posts more organized and easier to find the recipes or information you want to find.  I am sure enjoying all the learning I am doing!  Happy blogging everyone!


Friday 20 June 2014

Banana Chocolate Chip Muffins

Banana Chocolate Chip Muffins-Mom-in-law's Recipe

3 cups All Purpose Flour
3 cups Whole Wheat Flour
3/4 cup White Sugar or Honey
2 Tbsp Baking Powder
1 Tbsp Baking Soda
1/2 tsp Salt
2 1/2 cups Chocolate Chips
9-10 Ripe Bananas
1 1/2 cups Margarine or Butter
3/4 cup Milk
2 Eggs


Preheat oven to 350'F.

I always start with the bananas.  Remove all the peels and mash them.  
I use my wonderful Kitchen Aid to do it for me.  
You can use fresh ripe bananas or do what I do.  I take ripe bananas and put them in the freezer to use when I have 9-10 to use for the recipe.  I put them in whole with peel on.  The night before I make them, I take them out and let them defrost in a bowl on the counter.

While the bananas are mashing, I melt the margarine or butter in the microwave.

Once the bananas are mushed up, I add the eggs (one at a time), melted margarine (butter), 
and milk to the bananas.

 In a large bowl mix the flours, sugar, baking powder, baking soda, and salt.
I ran out of whole wheat flour, so I just used all purpose.

 Then add the chocolate chips.  If you want to eliminate the choocate chips, you can.  
I do make them with and without depending on my preference that day.  You can also make half the batch without and then add the chocolate chips later to the other half.

 Give all your dry ingredients a good mix!

Add the banana batter to the dry ingredients.

Mix up the batter pretty good.  Make sure to scrape the bottom of the bowl when mixing. 

You can grease muffin pans or just add paper muffin cups to your pans.
If you choose to add the paper muffin cups, give them a quick spray of Pam cooking spray to lessen the chance of the batter sticking to them.

Fill muffin cups about 3-4 full and it should yield 3 dozen.
My muffin cups are the extra large ones, so they don't quite make 3 dozen.
I like making lots of these muffins as they keep in the freezer well, if they make it there at all.

Bake in oven for 20-25 minutes and remove to wire rack.  
Once they are completely cooled store them in Tupperware containers or Ziploc bags.

I hope your family enjoys these wonderful muffins as much as my family does.
These are great to share at sports functions and school events.  
I know all the teenagers love them when they come for a visit.  Have fun baking!

Saturday 14 June 2014

Garage Sales-Saving You Money...

One of the ways I like to save money is by shopping at garage sales.  I have bought nice patio furniture, clothes, jewelry, kids toys, and so much more.  If you have a friend or family member that can go with you, it can be so much fun.  I went last weekend with my sister and niece.  We all found wonderful things and so I decided it might be fun to share a few with you.  Hope you enjoy!

I bought 1 dress and 4 shirts.  
The dress is Alfred Sung(the black and white one) and I paid $5 for it.
The tops I paid $4 each for a total of $16. 
My total for all this clothes was $21!

It was a great day for shoes for me.  I only buy shoes that are new or barely used.
The top left are a pair of golf shoes that I got free.  
The rest of the shoes, I paid $4 each and the Clarks sandals I paid $5.
My grand total for shoes was $13!


 I bought myself a hybrid golf club for $20 and got my golf shoes seen above for free.
I paid $4 for the skort.
Total of $24 for these!


This jewelry was a lot of fun.  
I found the long necklace and matching earrings at a sale and paid $7 for both.
A few houses down from this one I found the two real silver necklaces for $1 each.
I bought all this jewelry for $9 and could probably sell the silver stuff for at least $30 if I wanted to.

I had so much fun and we went from 8:00am to 12:00pm.  We find the garage sales that have multiple homes so we can walk instead of driving around.  This helps to keep our gas expenses down and allows us to visit with each other and have a lot of laughs.  I have bought furniture and other things for really cheap and then turned around and sold them in our local classifieds to make money on them.  It's always fun to run into other friends enjoying themselves and saving money.  This is my first money saving tip on my blog. Happy shopping everyone!